Blurring images
Overview
Teaching: 10 min
Exercises: 40 minQuestions
How can we apply a low-pass blurring filter to an image?
Objectives
Explain why applying a low-pass blurring filter to an image is beneficial.
Apply a Gaussian blur filter to an image using skimage.
Explain what often happens if we pass unexpected values to a Python function.
In this episode, we will learn how to use skimage functions to blur images.
When we blur an image, we make the color transition from one side of an
edge in the image to another smooth rather than sudden. The effect is to
average out rapid changes in pixel intensity. The blur, or smoothing,
of an image removes “outlier” pixels that may be noise in the image. Blurring
is an example of applying a low-pass filter to an image. In computer vision,
the term “low-pass filter” applies to removing noise from an image while
leaving the majority of the image intact. A blur is a very common operation
we need to perform before other tasks such as edge detection. There are
several different blurring functions in the skimage.filters module, so we
will focus on just one here, the Gaussian blur.
Gaussian blur
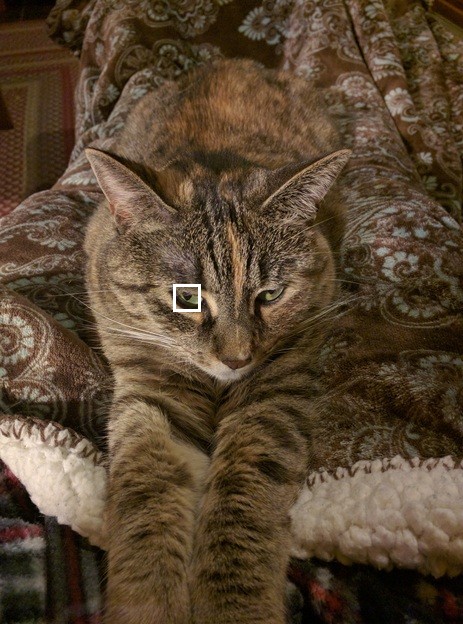
Consider this image of a cat, in particular the area of the image outlined by the white square.
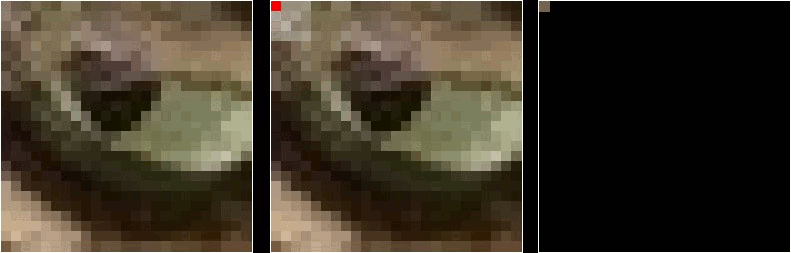
Now, zoom in on the area of the cat’s eye, as shown in the left-hand image below. When we apply a blur filter, we consider each pixel in the image, one at a time. In this example, the pixel we are applying the filter to is highlighted in red, as shown in the right-hand image.
![]()
In a blur, we consider a rectangular group of pixels surrounding the pixel to filter. This group of pixels, called the kernel, moves along with the pixel that is being filtered. So that the filter pixel is always in the center of the kernel, the width and height of the kernel must be odd. In the example shown above, the kernel is square, with a dimension of seven pixels.
To apply this filter to the current pixel, a weighted average of the the color values of the pixels in the kernel is calculated. In a Gaussian blur, the pixels nearest the center of the kernel are given more weight than those far away from the center. This averaging is done on a channel-by-channel basis, and the average channel values become the new value for the filtered pixel. Larger kernels have more values factored into the average, and this implies that a larger kernel will blur the image more than a smaller kernel.
To get an idea of how this works, consider this plot of the two-dimensional Gaussian function:
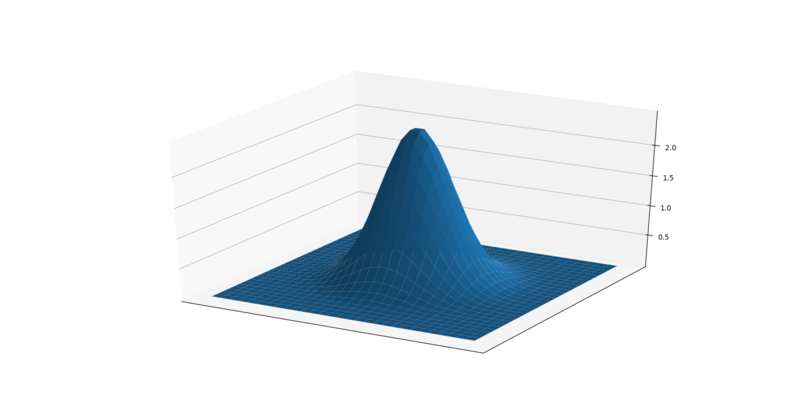
Imagine that plot overlaid over the kernel for the Gaussian blur filter. The height of the plot corresponds to the weight given to the underlying pixel in the kernel. I.e., the pixels close to the center become more important to the filtered pixel color than the pixels close to the edge of the kernel. The shape of the Gaussian function is controlled via its standard deviation, or sigma. A large sigma value results in a flatter shape, while a smaller sigma value results in a more pronounced peak. The mathematics involved in the Gaussian blur filter are not quite that simple, but this explanation gives you the basic idea.
To illustrate the blur process, consider the blue channel color values from the seven-by-seven kernel illustrated above:
68  82 71 62 100  98  61
90  67 74 78  91  85  77
50  53 78 82  72  95 100
87  89 83 86 100 116 128
89 108 86 78  92  75 100
90  83 89 73  68  29  18
77 102 70 57  30  30  50
The filter is going to determine the new blue channel value for the center pixel – the one that currently has the value 86. The filter calculates a weighted average of all the blue channel values in the kernel, {76, 83, 81, …, 39, 53, 68}, giving higher weight to the pixels near the center of the kernel. This weighted average would be the new value for the center pixel. The same process would be used to determine the green and red channel values, and then the kernel would be moved over to apply the filter to the next pixel in the image.
Something different needs to happen for pixels near the edge of the image, since the kernel for the filter may be partially off the image. For example, what happens when the filter is applied to the upper-left pixel of the image? Here are the blue channel pixel values for the upper-left pixel of the cat image, again assuming a seven-by-seven kernel:
  x   x   x   x   x   x   x
  x   x   x   x   x   x   x
  x   x   x   x   x   x   x
  x   x   x   4   5   9   2
  x   x   x   5   3   6   7
  x   x   x   6   5   7   8
  x   x   x   5   4   5   3
The upper-left pixel is the one with value 4. Since the pixel is at the upper-left corner. there are no pixels underneath much of the kernel; here, this is represented by x’s. So, what does the filter do in that situation?
The default mode is to fill in the nearest pixel value from the image. For each of the missing x’s the image value closest to the x is used. If we fill in a few of the missing pixels, you will see how this works:
  x   x   x   4   x   x   x
  x   x   x   4   x   x   x
  x   x   x   4   x   x   x
  4   4   4   4   5   9   2
  x   x   x   5   3   6   7
  x   x   x   6   5   7   8
  x   x   x   5   4   5   3
Another strategy to fill those missing values is to reflect the pixels that are in the image to fill in for the pixels that are missing from the kernel.
  x   x   x   5   x   x   x
  x   x   x   6   x   x   x
  x   x   x   5   x   x   x
  2   9   5   4   5   9   2
  x   x   x   5   3   6   7
  x   x   x   6   5   7   8
  x   x   x   5   4   5   3
A similar process would be used to fill in all of the other missing pixels from the kernel. Other border modes are available; you can learn more about them in the skimage documentation.
This animation shows how the blur kernel moves along in the original image in order to calculate the color channel values for the blurred image.
skimage has built-in functions to perform blurring for us, so we do not have to perform all of these mathematical operations ourselves. The following Python program shows how to use the skimage Gaussian blur function.
"""
 * Python script to demonstrate Gaussian blur.
 *
 * usage: python GaussBlur.py <filename> <sigma>
"""
import skimage
from skimage.viewer import ImageViewer
import sys

# get filename and kernel size from command line
filename = sys.argv[1]
sigma = float(sys.argv[2])
In this case, the program takes two command-line parameters. The first is the filename of the image to filter, and the second is the sigma of the Gaussian.
In the program, we first import the required libraries, as we have done before. Then, we read the two command-line arguments. The first, the filename, should be familiar code by now. For the sigma argument, we have to convert the second argument from a string, which is how all arguments are read into the program, into a float, which is what we will use for our sigma. This is done with the
sigma = float(sys.argv[2])
line of code. The float() function takes a string as its parameter, and returns
the floating point number equivalent.
What happens if the
float()parameter does not look like a number? (10 min)In the program fragment, we are using the
float()function to parse the second command-line argument, which comes in to the program as a string, and convert it into an integer. What happens if the second command-line argument does not look like an integer? Let us perform an experiment to find out.Write a simple Python program to read one command-line argument, convert the argument to an integer, and then print out the result. Then, run your program with an integer argument, and then again with some non-integer arguments. For example, if your program is named float_arg.py, you might perform these runs:
python float_arg.py 3.14159
python float_arg.py puppy
python float_arg.py 13
What does
float()do if it receives a string that cannot be parsed into an integer?Solution
Here is a simple program to read in one command-line argument, parse it as and integer, and print out the result:
"""
 * Read a command-line argument, parse it as an integer, and
 * print out the result.
 *
 * usage: python float_arg.py <argument>
"""
import sys

value = float(sys.argv[1])
print("Your command-line argument is:", value)
Executing this program with the three command-line arguments suggested above produces this output:
Your command-line argument is: 3.14159

Traceback (most recent call last):
  File "float_arg.py", line 9, in <module>
    value = float(sys.argv[1])
ValueError: could not convert string to float: 'puppy'

Your command-line argument is: 13.0
You can see that if we pass in an invalid value to the
float()function, the Python interpreter halts the program and prints out an error message, describing what the problem was.
Next, the program reads and displays the original, unblurred image. This should also be very familiar to you at this point.
# read and display original image
image = skimage.io.imread(fname=filename)
viewer = ImageViewer(image)
viewer.show()
Now we apply the average blur:
# apply Gaussian blur, creating a new image
blurred = skimage.filters.gaussian(
    image, sigma=(sigma, sigma), truncate=3.5, multichannel=True)
The first two parameters to skimage.filters.gaussian() are the image to blur,
image, and a tuple defining the sigma to use in y- and x-direction,
(sigma, sigma). The third parameter truncate gives the radius of the kernel
in terms of sigmas. A Gaussian is defined from -infinity to +infinity. A
discrete Gaussian can only approximate the real function. The truncate
parameter steers at what distance to the center of the function it is not
approximated any more. In the above example we set truncate to 3.5. With a
sigma of 1.0 the resulting kernel size would be 7.
The default value for truncate in sklearn is 4.0.
The last parameter is to tell skimage how to interpret our image, that has three
dimensions, as a multichannel color image.
After the blur filter has been executed, the program wraps things up by
displaying the blurred image in a new window.
# display blurred image
viewer = ImageViewer(blurred)
viewer.show()
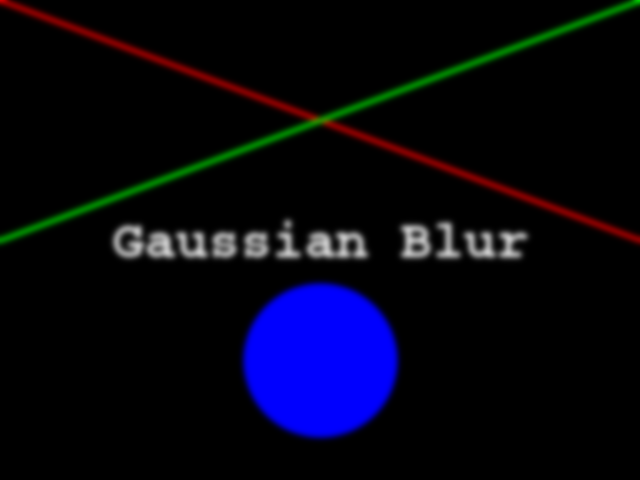
Here is a constructed image to use as the input for the preceding program.
When the program runs, it displays the original image, applies the filter, and then shows the blurred result. The following image is the result after applying a filter with a sigma of 3.0.
Experimenting with sigma values (5 min)
Navigate to the Desktop/workshops/image-processing/06-blurring directory and execute the GaussBlur.py script, which contains the program shown above. Execute it with two command-line parameters, like this:
python GaussBlur.py GaussianTarget.png 1.0Remember that the first command-line argument is the name of the file to filter, and the second is the sigma value. Now, experiment with the sigma value, running the program with smaller and larger values. Generally speaking, what effect does the sigma value have on the blurred image?
Solution
Generally speaking, the larger the sigma value, the more blurry the result. A larger sigma will tend to get rid of more noise in the image, which will help for other operations we will cover soon, such as edge detection. However, a larger sigma also tends to eliminate some of the detail from the image. So, we must strike a balance with the sigma value used for blur filters.
Experimenting with kernel shape (10 min)
Now, modify the GaussBlur.py program so that it takes three command-line parameters instead of two. The first parameter should still be the name of the file to filter. The second and third parameters should be the sigma values in y- and x-direction for the Gaussian to use, so that the resulting kernel is rectangular instead of square. The new version of the program should be invoked like this:
python GaussBlur.py GaussianTarget.png 1.0 2.0Using the program like this utilizes a Gaussian with a sigma of 1.0 in y- direction and 2.0 in x-direction for blurring
Solution
"""
 * Python script to demonstrate Gaussian blur.
 *
 * usage: python GaussBlur.py <filename> <sigma_y> <sigma_x>
"""
import skimage
from skimage.viewer import ImageViewer
import sys

# get filename and kernel size from command line
filename = sys.argv[1]
sigma_y = float(sys.argv[2])
sigma_x = float(sys.argv[3])

# read and display original image
image = skimage.io.imread(fname=filename)
viewer = ImageViewer(image)
viewer.show()

# apply Gaussian blur, creating a new image
blurred = skimage.filters.gaussian(
    image, sigma=(sigma_y, sigma_x), truncate=3.5, multichannel=True
)

# display blurred image
viewer = ImageViewer(blurred)
viewer.show()
Other methods of blurring
The Gaussian blur is a way to apply a low-pass filter in skimage. It is often
used to remove Gaussian (i. e., random) noise from the image.
For other kinds of noise, e.g. “salt and pepper” or “static” noise, a
median filter is typically used.
See the skimage.filter documentation
for a list of available filters.
Blurring the bacteria colony images (15 min)
As we move further into the workshop, we will see that in order to complete the colony-counting morphometric challenge at the end, we will need to read the bacteria colony images as grayscale, and blur them, before moving on to the tasks of actually counting the colonies. Create a Python program to read one of the colony images (with the filename provided as a command-line parameter) as grayscale, and then apply a Gaussian blur to the image. You should also provide the sigma for the blur as a second command-line parameter. Do not alter the original image. As a reminder, the images are located in the Desktop/workshops/image-processing/10-challenges/morphometrics directory.
Key Points
Applying a low-pass blurring filter smooths edges and removes noise from an image.
Blurring is often used as a first step before we perform Thresholding, Edge Detection, or before we find the Contours of an image.
The Gaussian blur can be applied to an image with the
skimage.filters.gaussian()function.Larger sigma values may remove more noise, but they will also remove detail from an image.
The
float()function can be used to parse a string into an float.